
Click here if you want to know how to use PIMPAMPUM or if you want to see an example:
http://y-generati0n.blogspot.com/2011/10/sample-4-pimpampum.html
Activity
Students: primary school (beginners)
Communicative goal: talking about likes and dislikes
After having worked with easy-to-follow poems:
Lesson 1: T will enter PIMPAMPUM and she will show Ss different poems or phrases as a warm-up activity. After that, she will ask them to write short sentences about something they really like. She will write some examples on BB.
Lesson 2: Ss will exchange their writings. Each student is going to work on PIMPAMPUM with the sentence he/she was given. Some minutes will be devoted so that Ss can explore the webpage. After that, T will show them the step-by-step and she herself is going to create a sentence in order to show them how to use the tool.
Lesson 3: Student will be given their sentences back. Now they will have to work on the one they themselves created. Once they've finished, they'll see the different pictures each student chose for the same sentence and compare.
Evaluation
* Use of LIKE / DON'T LIKE / ENJOY / LOVE/ HATE
* Use of vocabulary items that match the pictures chosen
lunes, 24 de octubre de 2011
FODEY - Activity
Click here if you want to know how to use FODEY or if you want to see an example:
http://y-generati0n.blogspot.com/2011/10/sample-3-fodey.html
Activity
Students: secondary school (intermediate)
Communicative goals:
- describing past events
- writing a newspaper article
After having read Rebecca by Daphne Du Maurier, Ss will do the following:
Lesson 1: Ss will discuss some general ideas about the novel. They will concentrate on the ending: T will ask questions such as: who do you think started the fire? why? did you like the end of the story? why?/ why not?
After that, T will ask them to work in pairs. They are going to write a newspaper article telling the people what really happened at Manderley. They will take some minutes in order to think about different possible ideas and exchange their opinions.
T will show them the webpage where they are going to work together with the step-by-step (which is quite short). The ones who are ready can start working on it.
Lesson 2: Ss continue working on their articles.
Lesson 3: Ss will exchange their work with other pairs and will read aloud the different newspaper articles.
Evaluation
* Reading material (oral questions to test fluency)
* Accurate use of grammatical constructions
* Team work
MIXBOOK - Activity
Click here if you want to know how to use MIXBOOK or if you want to see an example:
http://y-generati0n.blogspot.com/2011/10/sample-2-mixbook.html
Activity
Students: from 7th form on
Communicative goal: describing past events (simple past)
1st lesson: Ss work in pairs. One of them is going to tell the other what he/she did while on holiday. His/her classmate will have to guess where he/she has been (the place, I mean). After that, they will exchange roles.
Ss will enter MIXBOOK and T will show them some on-line publications under the category HOLIDAYS. They will create an account and investigate the site by themselves.
Ss will be asked to bring some pictures of their last holidays (or the ones they have retold their classmates) in a pendrive or a cd so that they can work next class on the computers.
2nd lesson: Ss will bring their pictures. Only between 15 and 20 of them will be selected to work with.
Ss start working on their project. T will show them the step-by-step (link) so that they know about the different tools they can make use of.
After that, Ss will start working on their projects. They will know in advance that only 1 more lesson will be devoted to finish it off. It will be compulsory to write a short description or comment for each photograph.
3rd lesson: Ss go on working on their projects.
4th lesson: Ss will make a presentation and share their projects with the rest of the class.
Evaluation
* Accurate use of grammatical constructions (particularly, the simple past form)
* Varied use of vocabulary related to "holidays"
* Use of the webpage (taking advantage of the tools offered)
GOANIMATE - Activity
Click here if you want to know how to use GOANIMATE or if you want to see an example:
http://y-generati0n.blogspot.com/2011/10/sample-1-goanimate.html
Activity
Students: 5th, 6th or 7th form
Communicative goal: talking about plans for the future ("going to")
1st lesson: Ss will watch some on-line videos created by other people as a warm-up activity. They are also going to create their accounts and investigate the website by themselves. For homework, they will be asked to write a 10-line dialogue (on paper) between two people and decide on the setting and characters. This might be useful for the teacher to correct beforehand in case there are any mistakes and for the students as well because they will have more time to think about it, erase, change things, etc.
2nd lesson: Ss will bring their dialogues already written on paper. They can share some of the ideas with the rest of the class and T will correct them. After that, they will be able to start working on their videos.
3rd lesson: Ss will share their work with the rest of the class and perhaps they can vote for the best one.
Evaluation
* Accurate use of grammatical constructions (particularly, "going to")
* Varied use of vocabulary
lunes, 17 de octubre de 2011
PIMPAMPUM - Description
Click here if you want to see some activities: http://y-generati0n.blogspot.com/2011/10/pimpampum-activity.html
PIMPAMPUM is a very nice webpage that allows students to work on images and words. This can be useful when it comes to poetry: they can create their own poems and then choose the appropiate images to express what they meant. It can also be useful with beginner learners if you want to work on vocabulary. It is very easy to use!
PIMPAMPUM is a very nice webpage that allows students to work on images and words. This can be useful when it comes to poetry: they can create their own poems and then choose the appropiate images to express what they meant. It can also be useful with beginner learners if you want to work on vocabulary. It is very easy to use!
The following steps will help you start using the website:
1) Go to the following web page: http://www.pimpampum.net/phrasr/index.php

2) Write the first stanza of your poem and click on START

3) Click on CHANGE in order to select the most suitable picture that represents the word written.
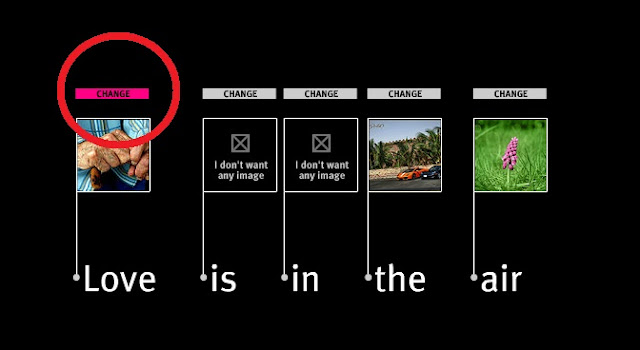
Once you’ve chosen it, click on DONE. If you don’t want a picture for any particular word, simply click on “I don’t want any image” and then on DONE.

4) Go through the same steps for each word you have in your stanza:

5) Choose and write a title and your name before you click on PUBLISH

6) Enjoy your presentation!
FODEY - Description
Click here if you want to see some activities: http://y-generati0n.blogspot.com/2011/10/fodey-activity.html
The following steps will help you create your newspaper article:
1) Go to the following web page: http://www.fodey.com/generators/newspaper/snippet.asp
Fodey is an interesting website which allows students to create their own newspaper articles. This is useful for them to realize about the different text formats. It is very easy to use because some guidance is provided. The only thing they have to do is write an article and complete the blanks. Then it is turned into a real newspaper article.
The following steps will help you create your newspaper article:
1) Go to the following web page: http://www.fodey.com/generators/newspaper/snippet.asp

2) Now you’ll have to complete the blanks:

Think of a name for your newspaper (make sure the name you are going to use does not exist in reality)
Write date, headline and type for your newspaper article!

3) Once you’ve finished, just click on “GENERATE”

4) You’ll get something like this:

5) Click on “Download your image” if you want to get the article on your computer.


This is my final product:
MIXBOOK - Description
Click here if you want to see some activities: http://y-generati0n.blogspot.com/2011/10/mixbook-activity.html
The following website provides the students with the opportunity of creating their own photo-albums which they can either print or share on-line. I find this tool useful when making projects because you can work on any topic. Students use the language at their disposal and, as they can choose what to share, it makes the activity more personal and motivating.
The following website provides the students with the opportunity of creating their own photo-albums which they can either print or share on-line. I find this tool useful when making projects because you can work on any topic. Students use the language at their disposal and, as they can choose what to share, it makes the activity more personal and motivating.
The following steps will help you create your mixbook:
1) Go to the following web page: http://www.mixbook.com/

2) Click on “sign up” on top of the page and create an account in order to be able to use the web page.

3) Complete the blanks with your first and last name. Add your address and your password. Once you are ready, click on “get started” and make sure you’ve agreed with the terms of use below (click on “Sign Up for the Mixbook Newsletter”)

4) Click on “create” on top of the page in order to start with your project.

5) Complete the blanks: think of a title, write a short description (for example, you can write the reasons why you have chosen to work with that particular topic, or you can explain what your mixbook is going to be about).
After that, choose a category, according to the topic chosen (that is, if your project revolves around your summer holidays, then choose the category “holidays” or “friends,” depending on what you have decided to focus on).
By clicking on “choose options” on your right, you can decide who can view your project later on, once it is finished. I’ve chosen “only friends” for privacy reasons.
Finally, click on “create Mixbook” and get started!

6) First, you need to select the size (this is because perhaps later on you would like to print it). My piece of advice is to choose according to the topic you have decided to work on. If you look below the categories, you will see what each of them is preferable for. In my case (as I would like to work on my summer holidays), I am going to choose number 2 (“select landscape”) because it is my idea to create a photography portfolio in order to show my photos.

7) Now select a theme. Click on the arrows to see more options. Once you have chosen it, go to “choose theme”

8) After clicking on "choose theme," you'll get the following window. Upload the photos you want to share.

You can select them either from your computer or from social networks. I recommend that you upload them from your computer, so click on “upload photos” and you’ll see the following:

9) Select the photos you like and click on “abrir” or “open” and your pictures will be uploaded one by one:

When you finish, just close the window and all your pictures will appear on your left ready to use!
10) I recommend that you decide in advance on the number of pages your mixbook will contain. Make use of the “page tools” at the right bottom in order to add a blank page or remove the ones you won’t use.

11) Click on the page you are going to personalize and drag the pictures you want to the big square on your right (that is the pre-view of the page you’ve chosen to work on)

12) Go to “layouts” on top of the page if you want to personalize the organization of the pictures. Remember that only the page selected will undergo this change. If you want to change the others, you’ll have to follow the same procedure for each of them.

13) Go to “backgrounds” in order to change your background page. Again, remember that only the page selected will undergo this change. If you want to change the others, you’ll have to follow the same procedure for each of them.

14) Go to “stickers” and add extra pictures and drawings.

Click on your favourite one and drag it to the main page. You can add as many stickers as you wish!

15) Click on “add text” and write a short sentence. You can choose its font, size and colour.

16) Once you’ve personalized all the pages (including front and back cover), save your work. You can do it any time you feel like in order not to lose what you have already done!

17) If you could not finish it and need extra help from your classmates, go to “invite” on top of the page and send an invitation to another person in order to help you complete your work:


Your friend will get the following e-mail:

He/She will only have to click on the link to help you finish.
18) Go “home” on top of the page. There, you will be able to see all your “in progress mixbooks” (that is to say, all the mixbooks you've created so far). The only thing we need to do now is click on “publish” so that you can start sharing your work on-line.

19) Once it is published, your friends only have to drag the pages as if it were a real book and enjoy your work!

20) If you want to print it, go to “order” and follow the instructions. Remember that you will have to pay for that!

Suscribirse a:
Entradas (Atom)