Click here if you want to see some activities: http://y-generati0n.blogspot.com/2011/10/mixbook-activity.html
The following website provides the students with the opportunity of creating their own photo-albums which they can either print or share on-line. I find this tool useful when making projects because you can work on any topic. Students use the language at their disposal and, as they can choose what to share, it makes the activity more personal and motivating.
The following website provides the students with the opportunity of creating their own photo-albums which they can either print or share on-line. I find this tool useful when making projects because you can work on any topic. Students use the language at their disposal and, as they can choose what to share, it makes the activity more personal and motivating.
The following steps will help you create your mixbook:
1) Go to the following web page: http://www.mixbook.com/
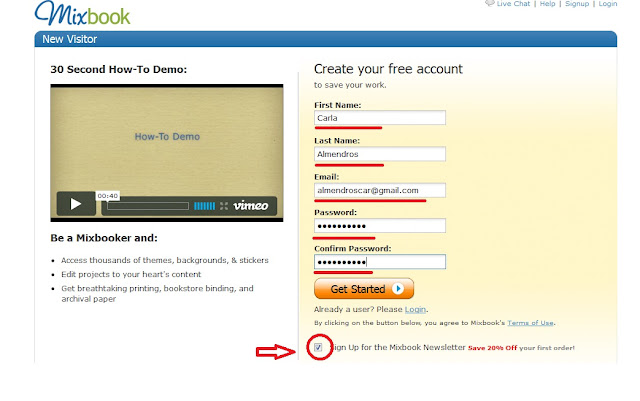
2) Click on “sign up” on top of the page and create an account in order to be able to use the web page.
3) Complete the blanks with your first and last name. Add your address and your password. Once you are ready, click on “get started” and make sure you’ve agreed with the terms of use below (click on “Sign Up for the Mixbook Newsletter”)
4) Click on “create” on top of the page in order to start with your project.
5) Complete the blanks: think of a title, write a short description (for example, you can write the reasons why you have chosen to work with that particular topic, or you can explain what your mixbook is going to be about).
After that, choose a category, according to the topic chosen (that is, if your project revolves around your summer holidays, then choose the category “holidays” or “friends,” depending on what you have decided to focus on).
By clicking on “choose options” on your right, you can decide who can view your project later on, once it is finished. I’ve chosen “only friends” for privacy reasons.
Finally, click on “create Mixbook” and get started!
6) First, you need to select the size (this is because perhaps later on you would like to print it). My piece of advice is to choose according to the topic you have decided to work on. If you look below the categories, you will see what each of them is preferable for. In my case (as I would like to work on my summer holidays), I am going to choose number 2 (“select landscape”) because it is my idea to create a photography portfolio in order to show my photos.
7) Now select a theme. Click on the arrows to see more options. Once you have chosen it, go to “choose theme”
8) After clicking on "choose theme," you'll get the following window. Upload the photos you want to share.
You can select them either from your computer or from social networks. I recommend that you upload them from your computer, so click on “upload photos” and you’ll see the following:
9) Select the photos you like and click on “abrir” or “open” and your pictures will be uploaded one by one:
When you finish, just close the window and all your pictures will appear on your left ready to use!
10) I recommend that you decide in advance on the number of pages your mixbook will contain. Make use of the “page tools” at the right bottom in order to add a blank page or remove the ones you won’t use.
11) Click on the page you are going to personalize and drag the pictures you want to the big square on your right (that is the pre-view of the page you’ve chosen to work on)
12) Go to “layouts” on top of the page if you want to personalize the organization of the pictures. Remember that only the page selected will undergo this change. If you want to change the others, you’ll have to follow the same procedure for each of them.
13) Go to “backgrounds” in order to change your background page. Again, remember that only the page selected will undergo this change. If you want to change the others, you’ll have to follow the same procedure for each of them.
14) Go to “stickers” and add extra pictures and drawings.
Click on your favourite one and drag it to the main page. You can add as many stickers as you wish!
15) Click on “add text” and write a short sentence. You can choose its font, size and colour.
16) Once you’ve personalized all the pages (including front and back cover), save your work. You can do it any time you feel like in order not to lose what you have already done!
17) If you could not finish it and need extra help from your classmates, go to “invite” on top of the page and send an invitation to another person in order to help you complete your work:
Your friend will get the following e-mail:
He/She will only have to click on the link to help you finish.
18) Go “home” on top of the page. There, you will be able to see all your “in progress mixbooks” (that is to say, all the mixbooks you've created so far). The only thing we need to do now is click on “publish” so that you can start sharing your work on-line.
19) Once it is published, your friends only have to drag the pages as if it were a real book and enjoy your work!
20) If you want to print it, go to “order” and follow the instructions. Remember that you will have to pay for that!


No hay comentarios:
Publicar un comentario